Sunday, January 20, 2013

MLS Photos

Since I've been wanting to research our home's history, I asked our realtor if he could find any additional information about its previous sales or owners.
He sent me all the listings for the house on the MLS system.  There were a total of 5 listings, including the one that was included in our house search this past spring. 
And there were 2 pictures of the house that I had never seen before.  One from 2003, with the house clean, the yard maintained, and the roof unstained.

Jack Templeton, Paul Irwin, Diane Irwin, Angelo Cremisino, Frank Flanagan
2003 Sale Listing

And the other was from 1997.  The roof looks similar to how it does now, a bit rust-stained, so it must've been replaced between 1997 and 2003.  But the landscaping is adorable!  Lush green grass, bright rose bushes, white stone edging and lights along the path to the door.  Now I know why we found so many rocks buried under the layers of dead grass in the front yard!

Jack Templeton, Paul Irwin, Diane Irwin, Angelo Cremisino, Frank Flanagan
1997 Sale Listing

It's inspiring to see this little house all dressed up with a fancy yard.  That's our hope for the yard next year, to brighten it up and give it a lot more curb appeal.  We were so overwhelmed with the moving this summer, and then it was so hot, that all we could manage was ripping out one of the giant, overgrown bushes, and putting two potted hibiscus next to the front door!

I wonder if it would be annoying to do that rock border again...

Tuesday, January 1, 2013

Revealing The Stairs


The stairs up to my office are wooden and gorgeous, from what I could see peeking out from under the green industrial-strength carpet runner that is nailed over them.  The carpet itself wouldn't have been so bad except that it probably hasn't been vacuumed in a decade!

The stairs on the day we moved in....  With lots of goodies left for me!

Looked at the stairs mid-day Sunday and decided today was the day to take that carpet out.  Started at each end and worked towards the middle, yanking out those claw-like carpet nails with only a couple hammers.  K was off to the big football game with our friends, and I couldn't find her cats-paw tools, so I had to make do with hammers.

My tiny hammer!

Under the carpet was so. much. dirt.  Like an inch in some places.

Dirty!!

A few hours and a pile of carpet nails later, I had the carpet off and rolled up into a thick, dirty bundle.  Swept and vacuumed the stair treads, and then went over each tread and rise with a strong solution of Dr. Bronner's and Murphy's Oil Soap.  The wood was SO dry and neglected.  It glowed when I was finished!

One tread is really cracked, and K is going to fix that later.  It is fixable and makes more sense than replacing the tread, since the wood probably wouldn't match.  At some point, I do want to sand and refinish the stairs, but that will have to wait, for now.

But they look SO much better already!

After
Before

Thursday, November 22, 2012

Patio Door for the Kitchen


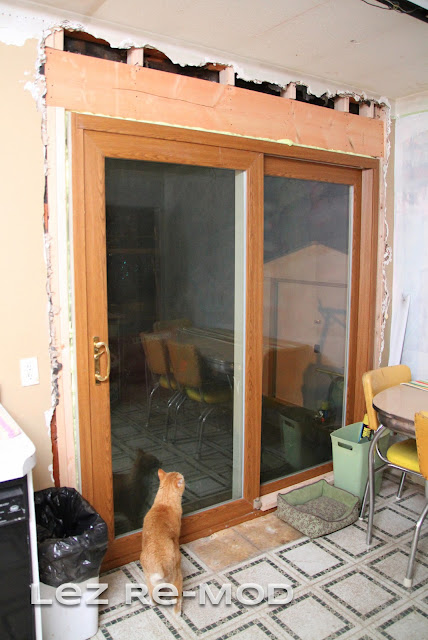
It's November in Minnesota, and although it's been a pretty mild fall, we know that our warm days are numbered.  Since it was a gorgeous day today, unseasonably warm for November, K thought she'd better get the patio door installed in the kitchen.

K got the patio door from one of her jobs-- they were putting an addition on that house and this door was removed and going to be thrown out.  K's not super fond of the faux-wood grain pattern on the door, but figures we've saved about $500 by salvaging the door.

Generally, we really like the layout of our house, but one funny thing is that there is no back door.  Obviously there's the front door out of the living room, and the door out of the mudroom on the side of the house actually opens to the front of the house.  It's not a big deal, but come summer, it will be really nice to walk directly out to the yard through the patio door, and to have the breeze coming in though the screen door...

In the kitchen, we had a large window looking out to the back yard.  The windows are pretty old, pretty drafty, and they vibrate and shake every time a train goes by.  The location was convenient for our window-unit air conditioner this summer, but hopefully we'll have our central air working again by next summer, so having a window here won't matter.


Let me just say this: my girl has some SKILLS!!  I knew this already...  I've seen houses and additions that she's built.  She's incredibly talented when it comes to building.  But it was really a treat to see her skills at work in OUR home!  From beginning to end-- starting to cut into the drywall to dropping off all the garbage-- the whole process took her less than 8 hours.

And I'm saying "she" instead of "we," because there was hardly anything I needed to do to help.  I helped clean up and keep the work area clean, I held up boards when she needed me to, and helped place the patio door.  But other than that, it was all her.  I just cooked dinner and kept taking photos to document the process.

First, she took the old window out:


Cut the studs out from the lower part of the wall.  She also had to move the heating vent from the wall to the floor in front of the door.  Cut all the siding off the outside of the house, in the area we needed.  Put in a new header, and then I was able to help her place the door and weather-seal the opening.
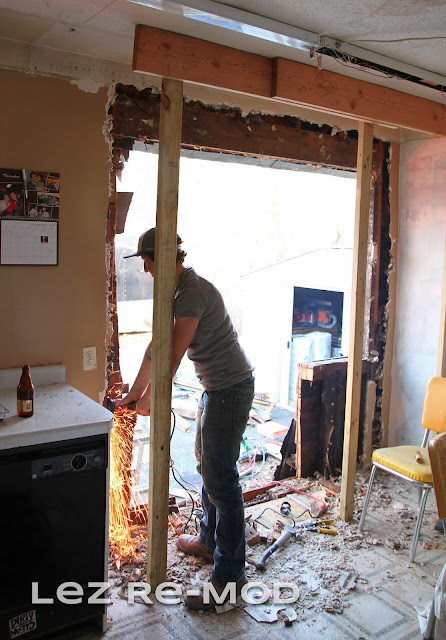
Sparks in the kitchen!
The area around the door still needs to be prettied back up, but at least it's sealed and watertight.  Inside the house, we're going to put in some more insulation before we seal up the drywall.  Outside, it looks pretty raw, but there may not be much we can do about it until we replace our siding.  (Which is pretty far down on our list, as far as importance and budget.)


The kitties (and K and I) love it!  We can look outside and see the whole backyard. 
K's going to install a motion light out there pretty shortly, so it will feel a bit safer.

Wednesday, October 10, 2012

Chandelier Rehab


K brought this chandelier home for me from a job.  The homeowner was getting all new lighting, and this was going to be trashed or donated.  K knew I would LOVE it, and she was right!  (I had one similar to this in my favorite apartment.)

Dusty, brassy goodness!

Beautiful details


But now I have a choice.  I can clean it up, make sure things are working properly...  but leave it the antiqued brass color.  OR, I could paint it.  I'm normally very against painting things, especially wood, to a color that they weren't originally.  But I've seen many pictures of painted chandeliers, and I'm just so drawn to the white ones!  This chandelier would be beautiful in white...  

I removed all the crystals, and soaked them in hot water and vinegar. Drained and dried them.  Now, they *sparkle*!!  Removed the plastic candle tubes, and taped over the candle and bulb areas.  Brought it outside, and painted it with a few coats of satin white spray paint, over the course of a few days.

Because a leafy, windy day is really the best time to spray paint something. 

white chandelier, painted chandelier, DIY chandelier, chandelier re-do


Amazing what a change it made!


Took a drive to Mohn Electric, in Uptown.  They helped me match the candle tubes, and grabbed me some new cardboard insulators.  Once home, I had to trim all the tubes down to 3 1/2 inches, because Mohn only had 4-inch tubes.  (I had seen some 3 1/2-inch ones online, but by the time I'd pay shipping, the price was ridiculous!)

Now all that remains is to put in the bulbs and install the light.  For now, this sparkly chandelier will just sit in the corner of the bedroom and wait.  But at least I got to check one small thing off my To Do List!

Saturday, September 29, 2012

Scraping Popcorn on a Saturday Night


This is what you do as a homeowner, I guess!  Scrapin' popcorn ceiling on a Saturday night, while your friends are out at the bars. 


We don't mind.  We're hoping to get this ceiling finished before our housewarming party in October, but obviously we've got a lot of work ahead of us.  We have these beautiful, simple coves on the ceiling, and they're going to be so pretty when they're smooth and repainted.

Ceiling Coves

Tonight, we covered the floors with ram board, opened the windows, cranked the tunes, and had a few beers, while spraying and scraping off the popcorn coating.  Getting ourselves covered with gunk in the process... 

Romeo is supervising!

We got almost all the scraping done, probably 5/8ths complete.  K will also need to do a couple layers of skimcoat when we're done, plus sanding and painting. 

Monday, August 20, 2012

Basement Flooring Addition


K is a HUGE Packer fan.  Like, borderline obsessed.  I don't mind her preoccupation with the team, and I actually support pretty much whatever she wants to do when it comes to them.   Buy stock in the team?  Sure!  Go to pretty much any game that you can?  Sure!  Buy all sorts of Packer merch whenever you see it?  Sure!       And as a result of her team admiration and the encouragement of me and our families, K has amassed quite a collection of Packer swag.

While we were looking at houses, among our considerations were: "Where will T's office be?"  and  "Where will K's Packer room be?"

No joke-- it was a serious criteria for our perfect house.  A garage would be okay, but not ideal.  Preferably a office or a basement.

K has been working on her Packer basement in this house for quite some time.  The idea is that once she has her "calm zone," she will be able to work on house projects and then escape to a room that's settled. 

She got a few rolls of black rubber flooring, left over from a remodel job.  It's the kind of flooring you see in gyms because it has some bounce and absorbs shock.  Nice and comfy to put over a hard basement floor!

However, being that this is a football-themed room, K decided to paint the flooring green.  Packer green, turf green...  exactly.   She spray-painted it in the yard, green and then clear-coat.

Little assistant Syd, helping with the tape!

She installed it on the floor with plain carpet tape.  Not a permanent install, in case she replaces it with something else later.  And as she pulled off the baseboard, we saw that the basement used to be
PINK.  We were both surprised to see that color.  It does match the spatter paint that we saw on the cinder blocks, but it just seemed like an interesting color to paint basement walls.

Actually, along with the pale brick fireplace down here, and those spattered walls, a pink wall probably looked pretty nice.  Warm and cozy, with some rugs on the floor... 
Well, it's going to look pretty different now!


Monday, August 13, 2012

Was There A Chimney?


Looking at the front of our house, do you notice the stubby little chimney?


I didn't, at first.  It sort of looked like a planter.  Especially because there were overgrown weeds sprouting up out of it.

But we took a closer look, and we think the chimney used to go all the way up the front of the house.  This had to have been at least 16 years ago, since we have the MLS photo from 1997 and the chimney is short in that picture, too. 

Here are the bits of evidence that indicate the house once had a tall chimney:

#1-  Behind the wood trellis, the siding of the house is not the same.  It looks like just a piece of wood paneling, painted the same as the siding.


#2-  The eaves trough looks patched in this part.  It makes a little jump and the seams don't line up perfectly.  (Perfectly enough, though, since water doesn't leak out of the gutters here.)


#3-  The large pile of pale bricks in our backyard, at the end of the alley.  The pile is as much dirt as it is brick, but we can see them there.  And they match the bricks of the little chimney.


I would love, love, LOVE to find a picture of the house when the chimney was tall.  I think it would be really adorable.  I'd actually like to rebuild the chimney, but it doesn't fit into the designs that K has been working on.  It would probably be spendy, too.  And it's not like it would be functional.  --We figured out that the chimney now is just a plain tube sticking up from the roof in the back of the house.

So, until I find an actual picture of the house with the tall chimney, I decided to make one up so that I could see what it would look like.  I think it's cute!