Showing posts with label August. Show all posts

Monday, September 1, 2014

Pictures from Yesterday


Worked on the garage again today, but not NEARLY as long as we did yesterday.  It's starting to feel like the home-stretch, and we are so thankful for that.

Here are the photos from last night, although I stopped taking pictures once it got late.  Was just way too tired to think about it...

Lights!

The first great thing that happened yesterday was that we picked up a couple of shoplights and K installed them right when we got back from the Home Depot.  They make a huge difference inside the garage.

Placing the loft door

Before I got home, K had installed all the floor in our loft area.  We're going to use the space in the trusses for storage, so she put a plywood floor down.  We'll be able to enter the upper area from inside the garage, and we'll also have a door on the front of the garage to put long items and materials through.

House wrappers

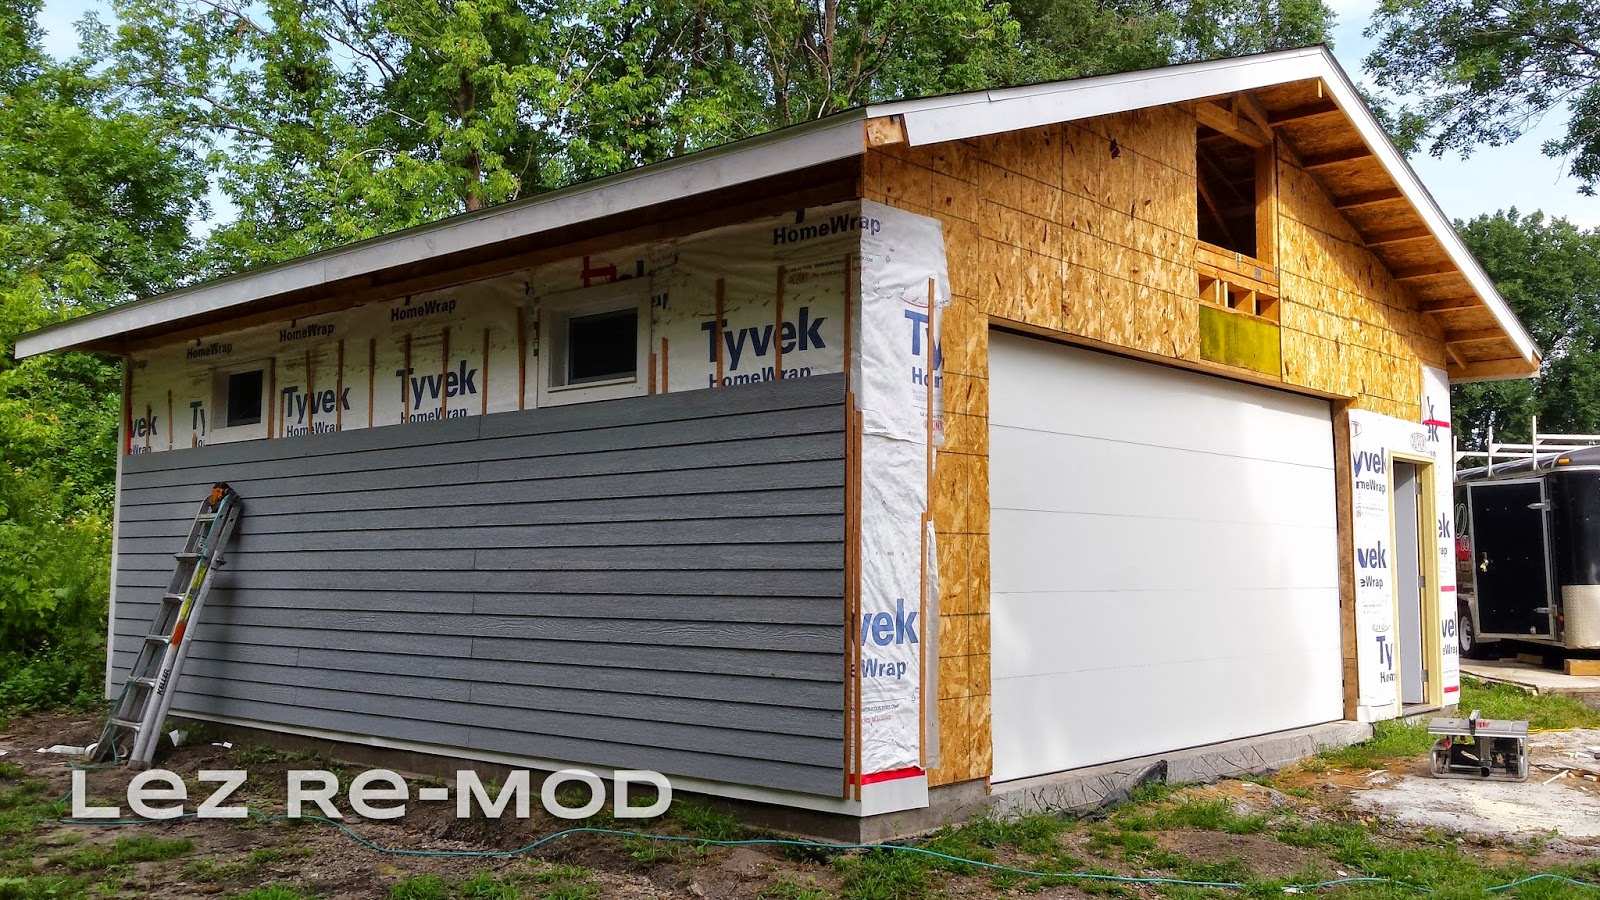
Then we put up Tyvek on the remaining space on the front of the garage.  Some fun-sounding Spanish-speaking festival was going on somewhere close by in the neighborhood, so we could hear all this upbeat Spanish music and a really excited announcer.  At about 7:00, however, the recorded music switched over to live music, and the singer was... probably not someone who should be singing anywhere other than karaoke at the NE Palace.  Not a great voice, and really off key!  Yikes!  After about an hour of that, K grabbed the radio so we could drown him out with The Current.

Finished house-wrap

The last thing we worked on was installing the spring system so that we can actually open the garage door.  K says it weighs like 500 pounds, so ever since it was installed, the door has stayed down.   K had watched a video on how to do this spring thing, and said it seemed really easy.  Yeah... sure.  It took hours.  Plus we were both really tired and couldn't really wrap our heads around anything logical.  At least, not quickly. 

However, when we were listening to the radio, they said that storms were expected to blow in around midnight, bringing high winds and possibly large hail.  So we were on a mission.  To get that door functioning well enough that we could get the truck pulled into the garage, and out again in the morning.

Starting the spring install

And that's the last photo I took.  The rain actually blew in at just after 9:00pm.  Crazy amount of rain, it seemed.  It just kept on pouring for at least a couple hours.  And by midnight, it seemed that the worst of the storm had passed (with no hail), but we kept working on the door system until 1-ish when we got it done.

And then passed out until late this morning.  Had to be done!


Garage - SO Close!


At 1 am this morning, the new Dodge Ram went to sleep in the new garage for the first time.  The big garage door is functioning, after a lot of futzing and tweaking.  This evening, the radio was reporting expected storms around midnight tonight, which would include high winds and large hail.  Since the door was already on and we had the hardware here, we shifted gears from Tyvek and siding prep, to making that garage door functional.  The idea that we could save the new truck from "large hail," by putting it in the garage tonight, was an actual possibility for the first time.

And then the storm hit at just past 9:00 pm, so who knows if we'll get anything that bad tonight.  At this point in the night, it doesn't seem so.

The next time K says, "It'll take like 10 minutes-- the video looks really easy," -- I WON'T believe her!  We were out there for hours installing those springs, and then she worked on them for close to an hour when I went inside for a break.

My shift today: 3:30 pm - 1:10 am.   K's shift: even longer-- don't know what time she started outside, but she had all of the plywood floor installed in the loft when I got home at 2:30 today.

We're exhausted and feeling optimistic again.  We're SOOOO close to being done!  Finally!


Sunday, August 24, 2014

Garage Windows


The installation of all the garage windows is complete today!  K installed the four windows on the sides of the garage.  G came over to help, too, and we pre-made all the boxes for the windows, so the process went really quickly.  Then trimmed them out, and they look great and they work!  It's a good feeling getting these big steps finished.

Installing window #5


Windows and trim on the side walls

I was taking the pictures on my phone today, instead of my good camera, and when I looked at them on my computer I saw that my phone had done something really funny!  --  I took quite a few pictures of K installing that same window, because the delay on my new phone is really bad and I kept missing her.  And when I looked at my online backup, I saw that my phone had decided to turn this series of photos into an animated GIF!  Ha ha!!


K in action!  Speedy window installer!


Friday, August 15, 2014

Garage Doors


Time to post some exciting pictures!  I had very little to do with the progress today-- K and her brother installed the big garage door today, and I helped K lift the utility door in place.  And they got a bunch of siding done this week, too.

Garage door from the inside


Both sides of the garage look like this now!

At night -- it's starting to look more complete!

Monday, August 11, 2014

Garage Windows and Siding - Day 492


So many days into this project and I've lost count.  And I haven't even been involved in the majority of them.  K has been knocking it out with her brother, our friends and by herself.  And sometimes with me. 

We've gotten a lot completed, but there are so many steps in the whole process that we just have a lot left to go.

A couple weeks ago, K and our buddy G installed the three windows on the back wall.  At the last minute, K decided to not install the salvaged 1950s windows that we've been storing in our back yard for the past year.  Those windows are double-paned, which is good, but they also don't open and she thought she would have a lot more work framing them in.  I told her to do what she needed to do, so she bought six basement egress-style windows from the Home Depot.  Mid-priced, standard-sized, with screens.  She did need to frame in the openings quite a bit, as the new windows were smaller than the ones we had planned.

She did also get to use one salvaged window-- a great crank-open window, which she turned on its side.  It's a lot bigger than the others, and it looks fantastic.


K and G were out there all day, and they didn't even make me come help.  I just refilled water bottles and went on a sub run.  Lucky me!

CUties!!  I love this picture.

So, forward to the present.  On Friday, we worked on the siding in the back from 6:30-11pm.  We brought some lights outside to keep going, but it was tricky.  No pictures from that night, because I wanted to hurry and just get inside.

On Saturday, we went out there at about noon, and worked until 8:30pm.  We made pretty good progress on the siding, considering I'm a newbie at this.


I also tried to keep up on caulking the seams and any nail holes that were too deep.

Nail hole
Caulking all the holes


It was a long day.  Our friend, G, came over again to help us for a while, and so did one of our neighbors.  It was nice to have the help!


By the end of the day, this is about where we were in the progress.  All in between the windows.  Nice, short pieces.  It feels like it goes up quickly, but it really takes time to get it right.

On Sunday, we were out there for another 7 or 8 hours, I forget.  It started raining quite a bit around 7:00 or so, but we kept going whenever it slowed.  I was cutting the metal soffit material and she installed it, and we both kept going with the siding up onto the gable.

We had to raise the scaffolding higher to reach the top of the gable and the soffit, so I was standing up there with my head leaning against the eaves!

Too tall!  Bumping against the roof.


Tall scaffolding

K putting in the soffit covering

Lots of progress!  Feels good!


Sunday, August 25, 2013

Peach Siding - Another Spotting


Yesterday evening, when we were working on taking down the other elm, I noticed some more peach paint peeking through on our siding!

The electric meter is there on the side of the house, but at some point, the meter was changed--  the meter that is there now is smaller and a different shape than what was there previously.

More peach!


Saturday, August 24, 2013

Sicky Elm Tree - Update

So, our lovely treehouse elm has been taken down.  We cut it down on Friday evening, and today we dealt with the branches and logs.

There are no pictures, I didn't bother.  It wasn't fun and it wasn't exciting.
It was just sad.


Tuesday, August 6, 2013

Sicky Elm Tree


Oh, I'm so sad!  Came home today to find this note in our mailbox:


Our treehouse elm has Dutch Elm Disease and needs to be cut down.  Soon.
We had noticed recently that it looked wilted and a couple small branches had died off.  And what we just learned about Dutch Elm is that by the time the tree starts looking sick, it's pretty much too late to save it.

And here's the bright orange paint to go along with the letter...


The first time we saw the house, even though there were a dozen trees around this house, we both looked at this elm and thought it would be the best place for a tree house for our kids someday.


It's a beautiful tree.  Verrry big.  The branches extend over the sidewalk and part of the street on the side of our property.  I think this part looks so pretty.


We want to replace the fence some day, and had planned to move it to the other side of the tree, to get this tree more "in" our yard. 
The view from the back yard...


Elm canopy meeting up with the backyard ash, far overhead...


*sigh*.....

Saturday, August 3, 2013

Completed Garden Plot


I realized I forgot to post a picture of our completed garden plot!  We got it finished within a week, and I got my few little plants in there a couple days later -- basil plant from Trader Joe's, basil I grew from seed, a few radishes from seed, a couple green bean plants from seed, and a cucumber plant from seed that died off right away.


I plan to throw some catnip and dill seeds in there and see if I can get anything before the end of summer.  I realize I got a late start on some of this--  I'll be lucky if I even get any green beans!  But I don't really care.  It's just fun growing this stuff, and the herbs can be used right away.  For next year, I can make a better plan and take advantage of all the space.

At least it's done!  It gets great sunlight now that the tree is trimmed, and I've been making sure to keep up on watering.

It should last us at least a couple years, and by then we will have a better idea of how we want things in the back yard, so we can either move it or keep it here.


Thursday, August 1, 2013

Stairs For The Patio Door


Ever since K put the patio door in last fall, we've had only a simple wooden step outside of the door.  It was just one step, so it was kind of a big jump.  And by this summer, we'd used it enough that it was becoming a bit rickety -- it wasn't really anchored in well.

The siding around the door wasn't finished, either, which didn't bother us much.  It was kinda ugly, but we figured we'd re-do the siding some day and it would get finished then.  But... our new insurance agency didn't like the un-finished-ness of the patio door area, and said we had to fix it because it wasn't "fire safe."  Hmm.  OK...  K knows the codes and didn't see a problem with the way it was.  But since we like our new policy, she said she could just fix it.  I offered to take a bunch of pictures so that our agent wouldn't have to run out to our house.

But, wow,  I'm glad she fixed it!!  I love our new step, and the house looks neater with just that simple white trim.

               Before:


                    After:

K anchored the steps into the asphalt and to the house, so they're really sturdy.


And the treads are made of Brazilian ipe, so they're really beautiful.  


Boy kitty enjoying the view...

Monday, August 20, 2012

Basement Flooring Addition


K is a HUGE Packer fan.  Like, borderline obsessed.  I don't mind her preoccupation with the team, and I actually support pretty much whatever she wants to do when it comes to them.   Buy stock in the team?  Sure!  Go to pretty much any game that you can?  Sure!  Buy all sorts of Packer merch whenever you see it?  Sure!       And as a result of her team admiration and the encouragement of me and our families, K has amassed quite a collection of Packer swag.

While we were looking at houses, among our considerations were: "Where will T's office be?"  and  "Where will K's Packer room be?"

No joke-- it was a serious criteria for our perfect house.  A garage would be okay, but not ideal.  Preferably a office or a basement.

K has been working on her Packer basement in this house for quite some time.  The idea is that once she has her "calm zone," she will be able to work on house projects and then escape to a room that's settled. 

She got a few rolls of black rubber flooring, left over from a remodel job.  It's the kind of flooring you see in gyms because it has some bounce and absorbs shock.  Nice and comfy to put over a hard basement floor!

However, being that this is a football-themed room, K decided to paint the flooring green.  Packer green, turf green...  exactly.   She spray-painted it in the yard, green and then clear-coat.

Little assistant Syd, helping with the tape!

She installed it on the floor with plain carpet tape.  Not a permanent install, in case she replaces it with something else later.  And as she pulled off the baseboard, we saw that the basement used to be
PINK.  We were both surprised to see that color.  It does match the spatter paint that we saw on the cinder blocks, but it just seemed like an interesting color to paint basement walls.

Actually, along with the pale brick fireplace down here, and those spattered walls, a pink wall probably looked pretty nice.  Warm and cozy, with some rugs on the floor... 
Well, it's going to look pretty different now!


Monday, August 13, 2012

Was There A Chimney?


Looking at the front of our house, do you notice the stubby little chimney?


I didn't, at first.  It sort of looked like a planter.  Especially because there were overgrown weeds sprouting up out of it.

But we took a closer look, and we think the chimney used to go all the way up the front of the house.  This had to have been at least 16 years ago, since we have the MLS photo from 1997 and the chimney is short in that picture, too. 

Here are the bits of evidence that indicate the house once had a tall chimney:

#1-  Behind the wood trellis, the siding of the house is not the same.  It looks like just a piece of wood paneling, painted the same as the siding.


#2-  The eaves trough looks patched in this part.  It makes a little jump and the seams don't line up perfectly.  (Perfectly enough, though, since water doesn't leak out of the gutters here.)


#3-  The large pile of pale bricks in our backyard, at the end of the alley.  The pile is as much dirt as it is brick, but we can see them there.  And they match the bricks of the little chimney.


I would love, love, LOVE to find a picture of the house when the chimney was tall.  I think it would be really adorable.  I'd actually like to rebuild the chimney, but it doesn't fit into the designs that K has been working on.  It would probably be spendy, too.  And it's not like it would be functional.  --We figured out that the chimney now is just a plain tube sticking up from the roof in the back of the house.

So, until I find an actual picture of the house with the tall chimney, I decided to make one up so that I could see what it would look like.  I think it's cute!