Showing posts with label free stuff. Show all posts

Tuesday, May 5, 2015

Organizing & Purging


Came home from work today and found that K and her bro had done SO much in our house to clean and organize it.  It feels amazing in here.

First off, the baby's room is cleared out and ready to set up for the little one.  Just about as soon as K had the trim up and the room finished, we started putting tools and supplies in that room-- just to keep them nearby.  Stuff that had been in the living room, until we got that couch and got going on finishing the living room.

Now, the baby's room is clean and ready to go.  Our spare bed is set up in there-- that's where family who visits will sleep while we have the babe in our room for the first couple months.  And my old Ikea bookshelves are in there, too-- I'll get some bins and see if they will be useful in there.  If not, we'll move them out to the alley and post a curb alert.

We had a ginormous sisal rug that took up almost our whole living room-- which was helpful when we used that rug to cover up the ram board on the floor.  We want a rug for the living room, but haven't decided on what to get, and it's low-priority right now.  So she cut that big sisal rug to a more useful size and put that in our living room, under the couch.  It looks pretty good.

Lastly, our beloved air hockey table is gone.  It's bittersweet, really.  We acquired the table from some friends when we rented from them, and we have moved it 2 times.  And it is a BIG MF-ing table!!

It took up a lot of room in our basement-- pretty much made us configure the furniture down there in a certain way.  Yeah, it was a blast to play at parties-- it was definitely a popular item in our house!  But K and I almost never played it, otherwise.  Eventually, it became more appealing to take back the space and let go of the table...

So when I pulled into the alley today, some guys were loading the table top into a van.  I totally hollered at them, "Yeah!  That's awesome that you're taking that!"  Turned out K had not posted any sort of ad online-- the guys had just been driving by and saw it.  She had it out there with all the pieces nicely piled, with the pucks and the handle thingies all ready to go.  Glad it's found another good home.

The awesome table at the rental where we got it...  Before we moved it 2 times...

Monday, May 4, 2015

Living Room is Almost Done!


The living room is just about complete.  The only thing remaining is trim-- just a few more baseboards and the trim around the windows.  It's so nice having a functioning living room... with a couch and a tv, and bookshelves.... 

A bit of history...

The only photo of the living room on the MLS listing (it looked like this when we first viewed the house):
At least 2 huge couches in here, lots of tapestries pinned on the ceiling.

The photo we took during our final walk-through, on the day we bought the house:

Blank slate - popcorn ceiling, vertical blind, floors and walls that needed love

In between, it was mostly a storage room.  For years, just boxes and bins and stuff waiting to move into other rooms. 

And now....!!

Just needs the trim on the windows!

And the wall of shelves:


The shelves are pretty bare right now.  I gotta get some more BOOKS on there soon.

Friday, March 27, 2015

Living Room Shelves


K and I got a little sidetracked from our kitchen project...  We needed a little break, so we worked on something cool in our living room. 

I have had a couple Ikea Billy bookshelves forever, and was excited to get those into our living room and get my BOOKS onto the shelves, finally!   But K was reluctant, and couldn't figure right away why she didn't want the shelves and books in the living room.

She came up with the solution a couple days ago-- she would make built-in shelves for the living room.  What bothered her about my bookcases is how they just floated in the room and weren't connected to anything.  She didn't want shelves to be pieces of furniture in the room, she wanted shelves that were a part of the room.  She looked up mid-century shelves and was inspired by the wall units she saw.  Stuff like this:

Image via Google Images

She showed me a plan on Google Sketch-Up, to put shelves on the biggest wall in our living room, using galvanized pipe and wood shelves.  We played around with the measurements and placement of the shelves-- we both agreed it would be cooler if the shelves weren't exactly symmetrical.  And she fit the TV into the unit-- with the idea that we'd move her basement TV to the living room and she'd get a larger TV for the basement.

Planning, measuring, and counting the units of galvanized pipe and pipe fittings, then a couple trips to the Home Depot and we had everything we needed.

The first piece


Babes putting up the 2nd column

We made some mistakes-- it's not the easiest project we've done, that's for sure.  But we figured it all out eventually.  And K found that some oak boards she'd been storing for about 4 years were going to be the perfect amount for making our shelves.  Which was great-- less to buy, and they'd already been salvaged from another project. 

The shelves still need to be stained, but we've made a lot of progress.  We love that we can still see the wall and the coves!


Trying out some stuff on the shelves

Thursday, March 19, 2015

The Start of an Actual, Real-Life Living Room!


Since we bought this house, we have never had a living room for more than a day or two.  We started scraping the popcorn ceiling pretty quickly after we bought it, but then never finished.  I can think of a couple events -- a holiday party in 2012, and Thanksgiving in 2014 -- when we made it presentable enough.  But underneath the sisal rug, there was still Ram Board, and storage items were covered in drop clothes against one wall.  And it was always temporary.  For most of our almost 3 years here, the living room has been a storage space.

Today, that finally changed!  K was offered a free couch at her current work project, and we decided it was a great idea that she brought it home.  The room was close to being done-- ceiling and walls all done, floors too, of course.  Just the baseboards and trim needed to be added.  So we picked up the drop cloths on the floor, moved the tools and projects into the baby's room, vacuumed the floors.  K added the base boards to most of the room.

Baseboards in progress
The couch is a simple one from Ikea.  The cushion covers had been spilled on by the previous family's children, but I got them washed up and they look much better.  Ikea sells them separately, too, so we can replace them sometime soon.

Someday we'd like to get a nice couch from Room & Board, but for now, this one is perfect.  Durable, and the cushions are not new, so they've off-gassed already, and not so old that they're not falling apart.  The color is perfect, and we'll probably replace the legs with something more mid-century-looking.  K has already found some legs online that we can order.


New-to-us couch on our pretty, pretty floors!  <3

Monday, February 9, 2015

Clean & Calm Bedroom


We have our bedroom back!  The floor is refinished, the walls are repaired and painted, the ceiling is painted, the outlets have been replaced to code, windows painted, stained trim and base added, curtains re-hung.

New nightstands and a new bed-frame to follow, along with new door hardware and a new bedroom door.  The original door was too damaged to paint and save, so it was just easier to pull the whole thing out and get it out of the way for the floor guys.


The room is calm and clean, and after about a month of sleeping in our basement and at our neighbors' house-- the bed feels huge!  I think we both slept funny last night-- it was almost like we were sleeping in unfamiliar surroundings. 

Here is what the room looked liked when we bought the house:


We had primed over the red walls pretty soon after moving in, but that's how it stayed for at least 2 years afterwards.


I just LOVE how the floors turned out.  The color is so rich and all the detail in the wood grain shows so vibrantly.

Oh, and did I mention that our trim was FREE?  K found a bunch of it at the side of the road somewhere, pulled out of a 1950s home.  K said it was a pain in the butt to sand and re-stain, but once they were installed, we are both really happy with the results. 

Sunday, July 21, 2013

Rushed Re-Grading & Flower Beds


The weather was just gorgeous on Friday, so when I got home from work I found K working in our yard. 

One front corner of our house is where that water leaking happened before we moved in.  The ground kind of dips at that corner, and K has been meaning to re-grade the yard there.  Now that we have all that freshly churned up soil from the excavator in the back yard and a little bit left that we dug up from the garden area, we had dirt that we could use for this.

Re-graded dirt, and poly about to go in.

Dirt over the landscape fabric

She piled up dirt to fill the dip and made sure it was piled higher against the house and sloped down to the yard.  She put thick poly over that layer, then another layer of dirt, then landscaping fabric and a last few inches of dirt.  I will still be able to put plants in there, by sticking them through the landscaping fabric, and that will help keep the weeds down.  She also put water-proof caulk in the crack between our concrete slab and the foundation on the side of the house.  The concrete is sloped properly, but water was likely seeping in through that crack to the area next to the foundation and basement below.

The area in the front of the house had been just areas of dirt and some grass with really nothing else growing there, and the egress window well in the middle.  I had put a potted hibiscus in front of the gas meter, for a while, to hide it.  And since we never got the window basket put up, we left it on the ground, instead.  Basically, the area wasn't doing much to improve our curb appeal. 

To border our new flower beds, K used some pavers from the giant pile of them we have in our back yard.  She got these free shortly after we got our house, from a work project where they had to take out the pavers to install a deck. 

K and her string-lines....  ;-)

One down, one to go.

I think the difference is noticeable.  The area looks like it's been taken care of.  It will look better once I get some flowers in there.  I'm hoping to add some flowering shrubs this week.  Right now, I'm thinking red rose shrubs, but we'll see.

Beds are level with our house, even though the yard slopes down.

The flower bed on the right will be next -- we'll make this match the left side.

K was rushing to get this "little" project done yet that evening, because her dad and step-mom were coming to stay with us the next day.  I know the feeling-- you just want to do anything you can to make the house look better than the last time they were here, so that it looks like we're making progress!

Last step was to get some grass seed onto the patches of bare dirt around the new flower bed, and hopefully get that grass to take hold and keep that newly sloped dirt from washing away.  We have some grass seed leftover from filling in the patches from the bushes in the front, the kind of seed that is mixed with recycled newspaper.  It works great, stays in place.  The grass is a different type than what is originally in the yard, slightly darker, so if you look close you can kind of tell where we patched the lawn, but I think it still looks great.

There's still time for grass seed to grow this year!

I'm really excited to get some flowers in here!! 


Wednesday, February 27, 2013

New Office Floor - Day 2 & 3


Took K a couple more days to get the laminate flooring installed in her office.  Of course, she had to hurry up, so she could get her desk and stuff back in there and get back to work! 


Here's the finished floor.  Not bad for FREE! 

Sunday, February 24, 2013

New Office Floor - Day 1


Last week, K found a great deal on Craigslist.  She often looks through the listings of free items to see if there are building materials she might want. 

The big score last week was approximately 450 square feet of laminate bamboo-look flooring.  Which had retailed for more than $1000 and had only been used for 3 years.  In a yoga studio.
Which means it was cleaned gently and often.  Shoes were not worn on it, pretty much ever.  And it included an expensive and cushy underlayment.

The flooring was free if you came in and UN-installed it for the building owner.  Which K did, and about 3 hours later we had a big pile of flooring under our kitchen table (including 2 unopened boxes that were in storage.)

Kristy removed some of the linoleum tiles that were loose, then installed the underlayer and started with the lengths of laminate.

Leftover tiles and cement with glue


Mallet-ing, mallet-ing...

Eventually, K had to call it a night.  Finishing the floor and adding the floor trim will have to wait for tomorrow.

Side note: Friday night was K's birthday party, and our friend was in our kitchen and said, "Where did you get that flooring...?"  Turned out it was from the studio she had worked at for years!  She had cleaned that floor probably a hundred times!  Hilarious!  What a small city...

Sunday, February 17, 2013

Chandeliers and Switch Plates

While having a lazy, laying-in-bed morning today, K and I discussed some of the decorating we plan to do in our bedroom, and I asked her if she could please put up the chandelier today.  It's been sitting in the storage room for a few months, finished.  And she said yes, she would put it up for us!  :-)

Here's the before:

That base is kind of cool-- I wonder what the glass looked like....

We got the chandelier up, with one quick $6 trip to the Home Depot to get the needed hardware that was slightly different than what was there from the old fixture.

Once all the bulbs were lit up, it was like, "Holy crap, we have to get a dimmer on this thing!"  With all those bulbs in a normal-sized bedroom, it was a LOT of light.  So K ran to her supply of goodies and grabbed a dimmer switch, and installed it.  I makes a huge difference!

Finished and lit up!  Except for the one bulb on the left that likes to go on and off...


white chandelier, painted chandelier

white chandelier, painted chandelier, vintage
The previous light fixture had a bigger base, as you can see around the medallion of the chandelier.  This will get fixed later!

And then that led into K working on our messed-up light switch situation.  The house has switches that don't do anything, lots of missing switch plates and a couple weirdly-placed outlets.  She fixed 2 broken switches, and figured out that our hall light is wired to a box that, until now, had an outlet in it.  In the middle of the wall!  So, now we've got a switch there and we are able to turn the hall light on and off without pulling a string attached to the fixture/ base holding a bare bulb.

K also put in a new switch at the bottom of the stairs leading to my office.  Until now, there has only been a foam insulator as a switch plate, with a normal up/down switch.  It seems really out of place there, on an inside wall.  Like, I could see putting one of those on an outside wall, if you really wanted to be picky about insulating every inch.  But this piece had obviously been painted over at least once, and it was just weird.

Foam insulator "switch plate"

Last week at the thrift store, K had found the coolest, strange, old switch for 25 cents!  It's the push button kind, and it's really just a clear lucite plate and you can put whatever kind of paper or fabric that you want underneath.

Whoever had owned it put a cool patterned, blue paper under the plate.  It looked kind of old, maybe even 50s, I'm not sure.  But the paper was double-sided and on the back was...  a crazy clown!!  The paper was perfectly centered so that if the clown was facing the front of the switch, the push-button would actually be his nose!  I flipped out and I had to have it!

Pretty, patterned paper


Clown face on the other side of the paper!
The brass button makes the perfect nose for him.


And while installing this switch, we found more pink paint had been on the walls of the stairway at some point.  A coral rose color pink, more vivid than the pink in the basement.


Here is how the thrift store switch turned out!  I love it!  Obviously, our walls still need some love, but we'll get to that at some point.

For now, I'm just excited that this button makes it easier to turn the lights on and off.  I'm usually going up the stairs carrying my breakfast or armloads of other stuff, and it's much easier to hit this switch with my hands full.


Boy kitty climbed the ladder to sniff the chandelier, then had to figure out how to get down!

white chandelier, painted chandelier, vintage chandelier, chandelier


Thursday, November 22, 2012

Patio Door for the Kitchen


It's November in Minnesota, and although it's been a pretty mild fall, we know that our warm days are numbered.  Since it was a gorgeous day today, unseasonably warm for November, K thought she'd better get the patio door installed in the kitchen.

K got the patio door from one of her jobs-- they were putting an addition on that house and this door was removed and going to be thrown out.  K's not super fond of the faux-wood grain pattern on the door, but figures we've saved about $500 by salvaging the door.

Generally, we really like the layout of our house, but one funny thing is that there is no back door.  Obviously there's the front door out of the living room, and the door out of the mudroom on the side of the house actually opens to the front of the house.  It's not a big deal, but come summer, it will be really nice to walk directly out to the yard through the patio door, and to have the breeze coming in though the screen door...

In the kitchen, we had a large window looking out to the back yard.  The windows are pretty old, pretty drafty, and they vibrate and shake every time a train goes by.  The location was convenient for our window-unit air conditioner this summer, but hopefully we'll have our central air working again by next summer, so having a window here won't matter.


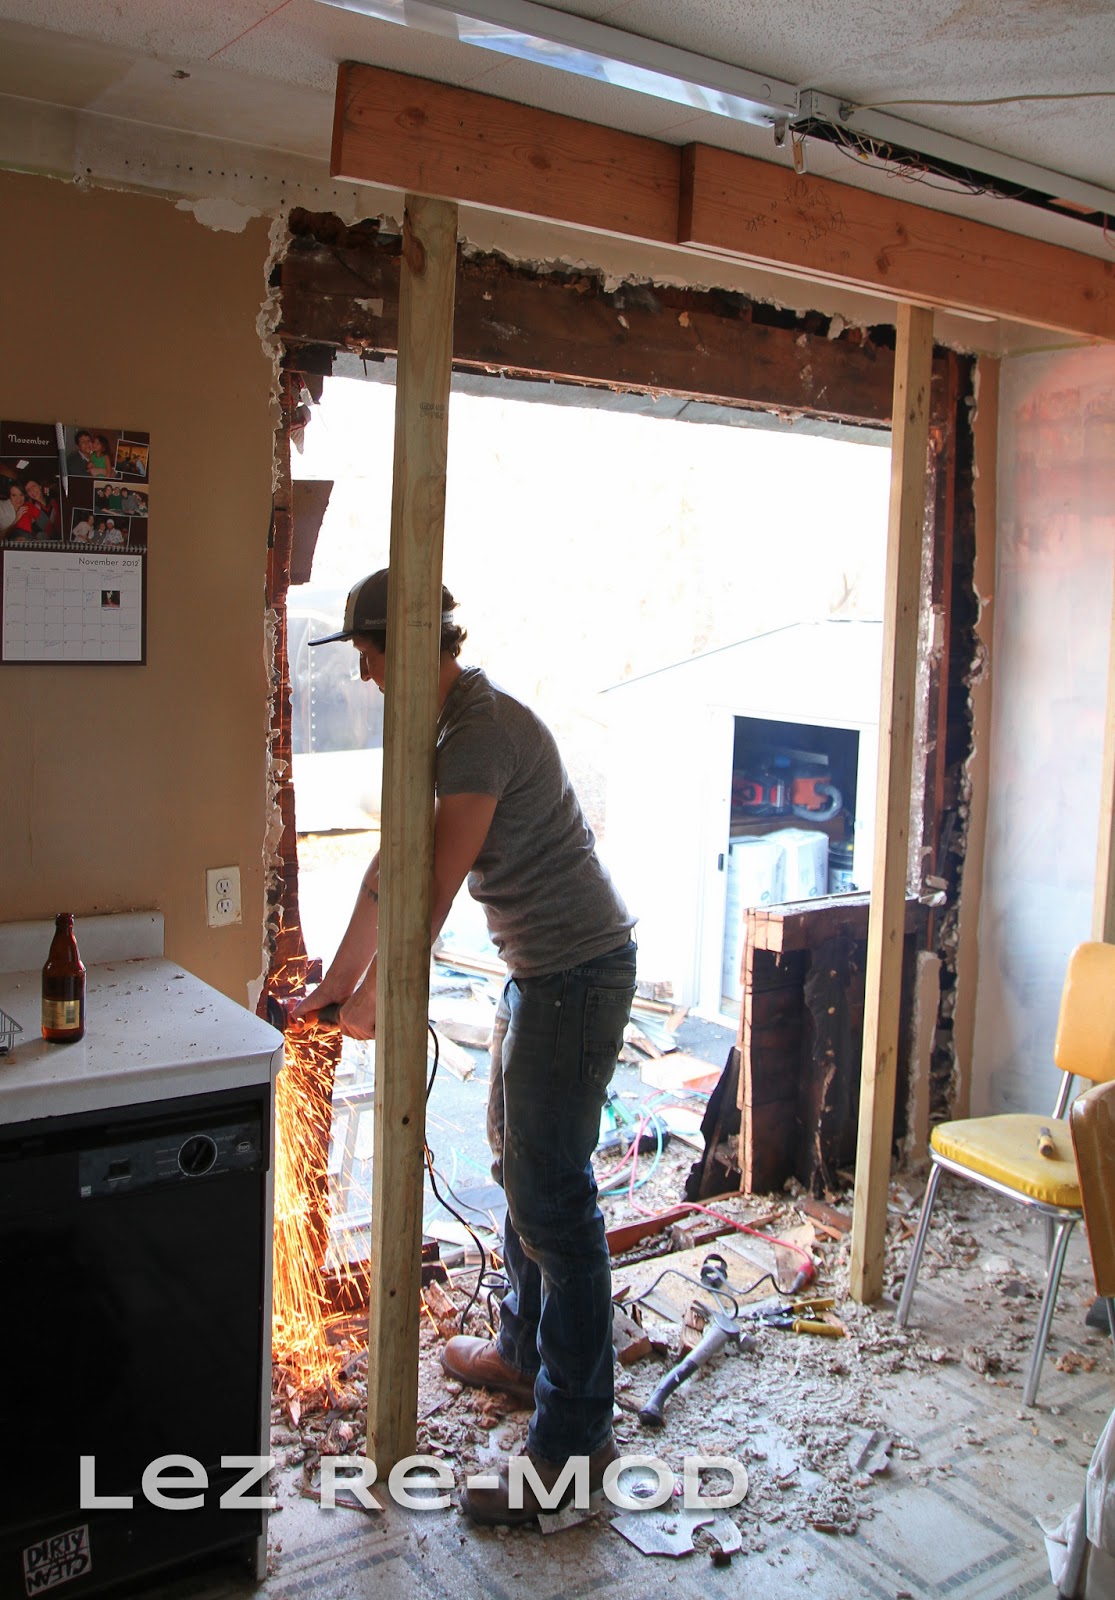
Let me just say this: my girl has some SKILLS!!  I knew this already...  I've seen houses and additions that she's built.  She's incredibly talented when it comes to building.  But it was really a treat to see her skills at work in OUR home!  From beginning to end-- starting to cut into the drywall to dropping off all the garbage-- the whole process took her less than 8 hours.

And I'm saying "she" instead of "we," because there was hardly anything I needed to do to help.  I helped clean up and keep the work area clean, I held up boards when she needed me to, and helped place the patio door.  But other than that, it was all her.  I just cooked dinner and kept taking photos to document the process.

First, she took the old window out:


Cut the studs out from the lower part of the wall.  She also had to move the heating vent from the wall to the floor in front of the door.  Cut all the siding off the outside of the house, in the area we needed.  Put in a new header, and then I was able to help her place the door and weather-seal the opening.

Sparks in the kitchen!
The area around the door still needs to be prettied back up, but at least it's sealed and watertight.  Inside the house, we're going to put in some more insulation before we seal up the drywall.  Outside, it looks pretty raw, but there may not be much we can do about it until we replace our siding.  (Which is pretty far down on our list, as far as importance and budget.)


The kitties (and K and I) love it!  We can look outside and see the whole backyard. 
K's going to install a motion light out there pretty shortly, so it will feel a bit safer.

Wednesday, October 10, 2012

Chandelier Rehab


K brought this chandelier home for me from a job.  The homeowner was getting all new lighting, and this was going to be trashed or donated.  K knew I would LOVE it, and she was right!  (I had one similar to this in my favorite apartment.)

Dusty, brassy goodness!

Beautiful details


But now I have a choice.  I can clean it up, make sure things are working properly...  but leave it the antiqued brass color.  OR, I could paint it.  I'm normally very against painting things, especially wood, to a color that they weren't originally.  But I've seen many pictures of painted chandeliers, and I'm just so drawn to the white ones!  This chandelier would be beautiful in white...  

I removed all the crystals, and soaked them in hot water and vinegar. Drained and dried them.  Now, they *sparkle*!!  Removed the plastic candle tubes, and taped over the candle and bulb areas.  Brought it outside, and painted it with a few coats of satin white spray paint, over the course of a few days.

Because a leafy, windy day is really the best time to spray paint something. 

white chandelier, painted chandelier, DIY chandelier, chandelier re-do


Amazing what a change it made!


Took a drive to Mohn Electric, in Uptown.  They helped me match the candle tubes, and grabbed me some new cardboard insulators.  Once home, I had to trim all the tubes down to 3 1/2 inches, because Mohn only had 4-inch tubes.  (I had seen some 3 1/2-inch ones online, but by the time I'd pay shipping, the price was ridiculous!)

Now all that remains is to put in the bulbs and install the light.  For now, this sparkly chandelier will just sit in the corner of the bedroom and wait.  But at least I got to check one small thing off my To Do List!