Tuesday, August 6, 2013

Sicky Elm Tree


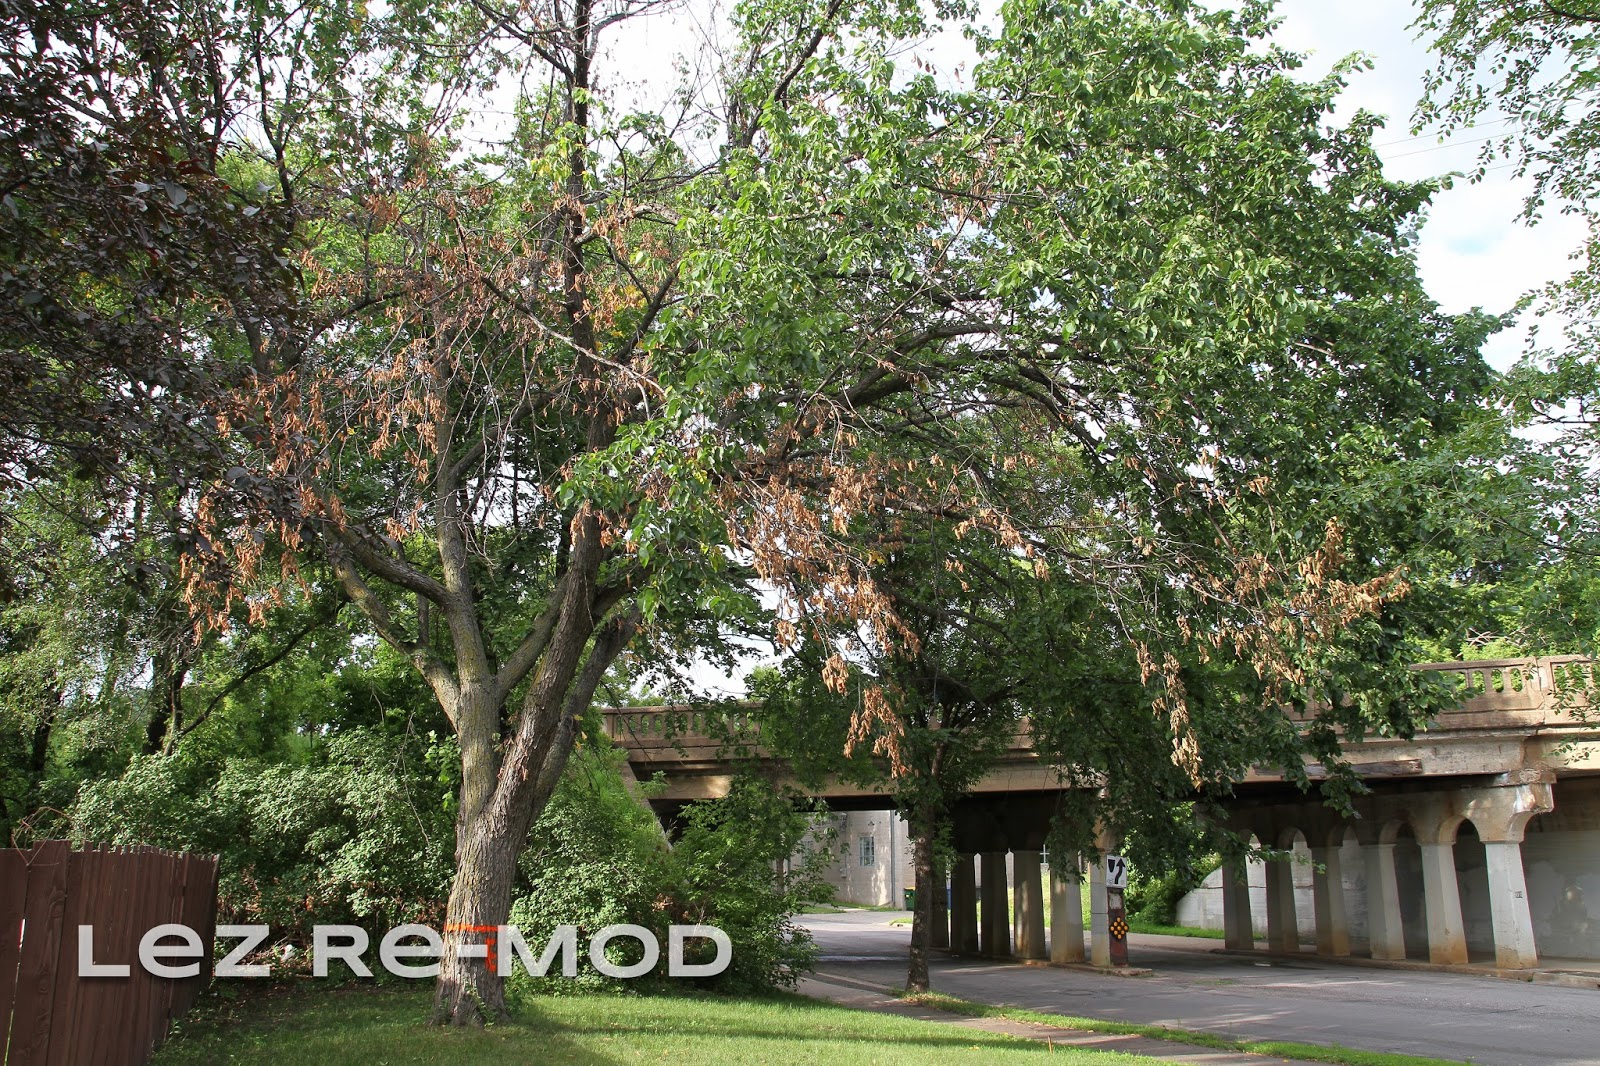
Oh, I'm so sad!  Came home today to find this note in our mailbox:


Our treehouse elm has Dutch Elm Disease and needs to be cut down.  Soon.
We had noticed recently that it looked wilted and a couple small branches had died off.  And what we just learned about Dutch Elm is that by the time the tree starts looking sick, it's pretty much too late to save it.

And here's the bright orange paint to go along with the letter...


The first time we saw the house, even though there were a dozen trees around this house, we both looked at this elm and thought it would be the best place for a tree house for our kids someday.


It's a beautiful tree.  Verrry big.  The branches extend over the sidewalk and part of the street on the side of our property.  I think this part looks so pretty.


We want to replace the fence some day, and had planned to move it to the other side of the tree, to get this tree more "in" our yard. 
The view from the back yard...


Elm canopy meeting up with the backyard ash, far overhead...


*sigh*.....

Saturday, August 3, 2013

Completed Garden Plot


I realized I forgot to post a picture of our completed garden plot!  We got it finished within a week, and I got my few little plants in there a couple days later -- basil plant from Trader Joe's, basil I grew from seed, a few radishes from seed, a couple green bean plants from seed, and a cucumber plant from seed that died off right away.


I plan to throw some catnip and dill seeds in there and see if I can get anything before the end of summer.  I realize I got a late start on some of this--  I'll be lucky if I even get any green beans!  But I don't really care.  It's just fun growing this stuff, and the herbs can be used right away.  For next year, I can make a better plan and take advantage of all the space.

At least it's done!  It gets great sunlight now that the tree is trimmed, and I've been making sure to keep up on watering.

It should last us at least a couple years, and by then we will have a better idea of how we want things in the back yard, so we can either move it or keep it here.


Friday, August 2, 2013

Design Plans - Update


I've been meaning to post these for a week or so...  I asked K to send me the sketches she made on Google Sketch-Up of her ideas for replacing the siding.

These pictures also include her idea for dormers on the front of the house.  With a flat roof on each dormer to give them a more modern look, rather than the traditional   ^  peak.  Though traditional to a Cape Cod style house, I thought that type of peak looked older and much less modern than we'd like to go for.

If we do end up going with the cement-board that we've looked at, our siding colors will be more gray and less blue than these pictures.  But it's easier to see the variation in these sketches, since they aren't all gray.

neptune green paint, 1950s house
The palette, so far...

remodel, 1950s house, 1952 house, cape cod house

Lots of new siding, and lots of variation in the siding.  This will allow us to use up the little bit of un-returnable scrap that K has accumulated, and also play a bit with the color and design.  We're also considering rock for the bottom section.  And there's my Neptune Green door!


Her plan includes a small new porch off the front of the house, and off to the right side.  Since we took off the awning over the front door, we don't have a roof covering the door, and we are definitely missing that when it's raining or snowing.

Keeping the privacy fence on the right side of the house is a must.  Some bedroom windows face this side, and the fence provides privacy from the street.  The yard is also out of view of the busy streets, which makes it really comfortable back there.


Doesn't the house look awake and cute with those dormers??  K also widened the triple window in the front.  We will replace these windows someday, and we could make the side windows wider when we do so, creating a larger panel of windows.  The other window in the front is also larger than we currently have-- I think she wants to center the window in that bedroom.

Annnnnnd...  K gets her white picket fence.  It sounds like she's wanted one of these for a while, or maybe just for this house.  But I think it will look great.  And, it will do much better at keeping litter out of our yard than our current fence, since the boards are much closer together.


This side roof over the mudroom is about the only thing we could do to make a "Mod 50's" roof on our house, without drastically changing our second level (not that we're totally opposed to changing that.)
Currently, the peak of this roof is right in the middle, and there is a metal awning extending out past the door.  If we remove the awning, and if K builds out the step in front of the door, we can also extend the roof out at that sort of low "modern" pitch.

It's a possibility!  Not sure how or when we'll get to the outside of the house, but it's really fun to think about.

Thursday, August 1, 2013

Stairs For The Patio Door


Ever since K put the patio door in last fall, we've had only a simple wooden step outside of the door.  It was just one step, so it was kind of a big jump.  And by this summer, we'd used it enough that it was becoming a bit rickety -- it wasn't really anchored in well.

The siding around the door wasn't finished, either, which didn't bother us much.  It was kinda ugly, but we figured we'd re-do the siding some day and it would get finished then.  But... our new insurance agency didn't like the un-finished-ness of the patio door area, and said we had to fix it because it wasn't "fire safe."  Hmm.  OK...  K knows the codes and didn't see a problem with the way it was.  But since we like our new policy, she said she could just fix it.  I offered to take a bunch of pictures so that our agent wouldn't have to run out to our house.

But, wow,  I'm glad she fixed it!!  I love our new step, and the house looks neater with just that simple white trim.

               Before:


                    After:

K anchored the steps into the asphalt and to the house, so they're really sturdy.


And the treads are made of Brazilian ipe, so they're really beautiful.  


Boy kitty enjoying the view...

Tuesday, July 23, 2013

Peach Siding?


On Friday, when K was building our new flower beds in the front of the house, we had to re-pin down the drain pipe in that corner of the house.  The bracket that holds it on has been broken since before we got the house.  So, right now the drain pipe is held in place with a couple of mini bungee cords--  K's secret weapon for everything.

While crouching at the corner of the house, helping K, I noticed this peach/beige-colored shadow from behind where the pipe used to be/should be attached:


I pointed this out to K (who was busy and distracted), and she's like, "I don't know, looks like that's the color the house used to be?"

And looking back on those MLS photos, I realize that in the 1997 photo the house looks like this peachy-beige color.  And in the 1999 photo the house is clearly yellow. 

1997 


1999


Sunday, July 21, 2013

Rushed Re-Grading & Flower Beds


The weather was just gorgeous on Friday, so when I got home from work I found K working in our yard. 

One front corner of our house is where that water leaking happened before we moved in.  The ground kind of dips at that corner, and K has been meaning to re-grade the yard there.  Now that we have all that freshly churned up soil from the excavator in the back yard and a little bit left that we dug up from the garden area, we had dirt that we could use for this.

Re-graded dirt, and poly about to go in.

Dirt over the landscape fabric

She piled up dirt to fill the dip and made sure it was piled higher against the house and sloped down to the yard.  She put thick poly over that layer, then another layer of dirt, then landscaping fabric and a last few inches of dirt.  I will still be able to put plants in there, by sticking them through the landscaping fabric, and that will help keep the weeds down.  She also put water-proof caulk in the crack between our concrete slab and the foundation on the side of the house.  The concrete is sloped properly, but water was likely seeping in through that crack to the area next to the foundation and basement below.

The area in the front of the house had been just areas of dirt and some grass with really nothing else growing there, and the egress window well in the middle.  I had put a potted hibiscus in front of the gas meter, for a while, to hide it.  And since we never got the window basket put up, we left it on the ground, instead.  Basically, the area wasn't doing much to improve our curb appeal. 

To border our new flower beds, K used some pavers from the giant pile of them we have in our back yard.  She got these free shortly after we got our house, from a work project where they had to take out the pavers to install a deck. 

K and her string-lines....  ;-)

One down, one to go.

I think the difference is noticeable.  The area looks like it's been taken care of.  It will look better once I get some flowers in there.  I'm hoping to add some flowering shrubs this week.  Right now, I'm thinking red rose shrubs, but we'll see.

Beds are level with our house, even though the yard slopes down.

The flower bed on the right will be next -- we'll make this match the left side.

K was rushing to get this "little" project done yet that evening, because her dad and step-mom were coming to stay with us the next day.  I know the feeling-- you just want to do anything you can to make the house look better than the last time they were here, so that it looks like we're making progress!

Last step was to get some grass seed onto the patches of bare dirt around the new flower bed, and hopefully get that grass to take hold and keep that newly sloped dirt from washing away.  We have some grass seed leftover from filling in the patches from the bushes in the front, the kind of seed that is mixed with recycled newspaper.  It works great, stays in place.  The grass is a different type than what is originally in the yard, slightly darker, so if you look close you can kind of tell where we patched the lawn, but I think it still looks great.

There's still time for grass seed to grow this year!

I'm really excited to get some flowers in here!! 


Friday, July 19, 2013

Excavator Madness!


Yesterday afternoon, K sends me this text:

excavator, removing tree stump, tree stump
        " This happened today :) "


Yup, that is an excavator in our backyard, digging up the stump and roots left over from our tree removal.  I was beyond excited when I got that text!

There have been 2 things holding up any further progress on the garage--
#1:  Figuring out to do with that stump.
The tree stump absolutely had to be removed.  With the way the plans lay out in the back yard, the stump would lie half under the concrete slab of the garage, and half under the asphalt driveway, which will eventually lead to one or both of those surfaces cracking as the dead wood rots away.  It's possible to change the plans, sure, but neither of us wanted that, if we could get the stump out instead.
#2:  Getting the plans OK'ed by the city.  (I don't think she has brought the plans in, yet, so this still remains.)

K asked the excavating subcontractor that they use at her job if, since the job site they're working at is 5 miles from our house, he would come over and see if this was something he could do.  She said he was working on it for about an hour, but got the entire stump and most of the root system up and out of the ground, evened out all the dirt in the area, and then used his shovel to pack down the loosened dirt into the hole left by the stump.  Amazing!!

Here are some pictures and video of the process:


And the result:


Look at how tall these roots are!