Thursday, November 22, 2012

Patio Door for the Kitchen


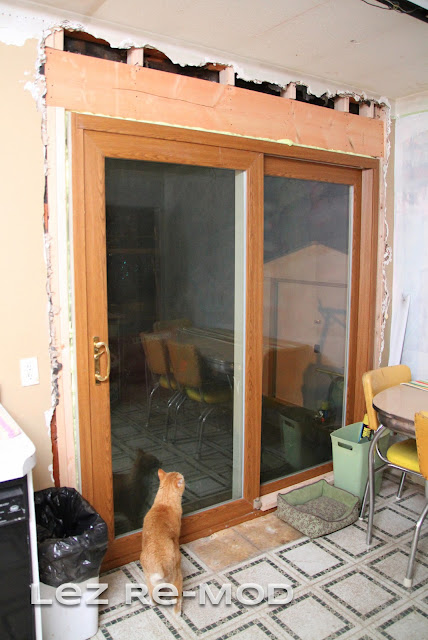
It's November in Minnesota, and although it's been a pretty mild fall, we know that our warm days are numbered.  Since it was a gorgeous day today, unseasonably warm for November, K thought she'd better get the patio door installed in the kitchen.

K got the patio door from one of her jobs-- they were putting an addition on that house and this door was removed and going to be thrown out.  K's not super fond of the faux-wood grain pattern on the door, but figures we've saved about $500 by salvaging the door.

Generally, we really like the layout of our house, but one funny thing is that there is no back door.  Obviously there's the front door out of the living room, and the door out of the mudroom on the side of the house actually opens to the front of the house.  It's not a big deal, but come summer, it will be really nice to walk directly out to the yard through the patio door, and to have the breeze coming in though the screen door...

In the kitchen, we had a large window looking out to the back yard.  The windows are pretty old, pretty drafty, and they vibrate and shake every time a train goes by.  The location was convenient for our window-unit air conditioner this summer, but hopefully we'll have our central air working again by next summer, so having a window here won't matter.


Let me just say this: my girl has some SKILLS!!  I knew this already...  I've seen houses and additions that she's built.  She's incredibly talented when it comes to building.  But it was really a treat to see her skills at work in OUR home!  From beginning to end-- starting to cut into the drywall to dropping off all the garbage-- the whole process took her less than 8 hours.

And I'm saying "she" instead of "we," because there was hardly anything I needed to do to help.  I helped clean up and keep the work area clean, I held up boards when she needed me to, and helped place the patio door.  But other than that, it was all her.  I just cooked dinner and kept taking photos to document the process.

First, she took the old window out:


Cut the studs out from the lower part of the wall.  She also had to move the heating vent from the wall to the floor in front of the door.  Cut all the siding off the outside of the house, in the area we needed.  Put in a new header, and then I was able to help her place the door and weather-seal the opening.
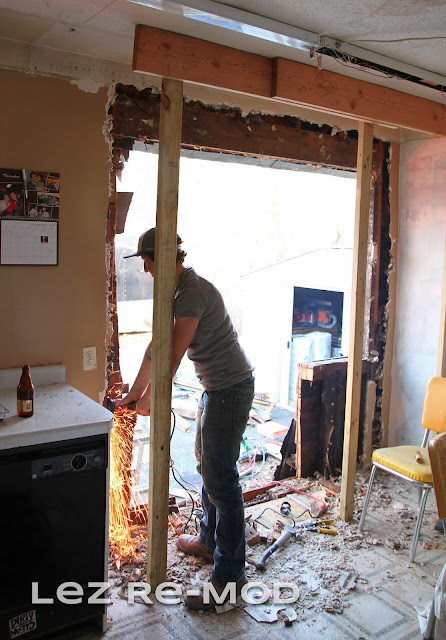
Sparks in the kitchen!
The area around the door still needs to be prettied back up, but at least it's sealed and watertight.  Inside the house, we're going to put in some more insulation before we seal up the drywall.  Outside, it looks pretty raw, but there may not be much we can do about it until we replace our siding.  (Which is pretty far down on our list, as far as importance and budget.)


The kitties (and K and I) love it!  We can look outside and see the whole backyard. 
K's going to install a motion light out there pretty shortly, so it will feel a bit safer.

Wednesday, October 10, 2012

Chandelier Rehab


K brought this chandelier home for me from a job.  The homeowner was getting all new lighting, and this was going to be trashed or donated.  K knew I would LOVE it, and she was right!  (I had one similar to this in my favorite apartment.)

Dusty, brassy goodness!

Beautiful details


But now I have a choice.  I can clean it up, make sure things are working properly...  but leave it the antiqued brass color.  OR, I could paint it.  I'm normally very against painting things, especially wood, to a color that they weren't originally.  But I've seen many pictures of painted chandeliers, and I'm just so drawn to the white ones!  This chandelier would be beautiful in white...  

I removed all the crystals, and soaked them in hot water and vinegar. Drained and dried them.  Now, they *sparkle*!!  Removed the plastic candle tubes, and taped over the candle and bulb areas.  Brought it outside, and painted it with a few coats of satin white spray paint, over the course of a few days.

Because a leafy, windy day is really the best time to spray paint something. 

white chandelier, painted chandelier, DIY chandelier, chandelier re-do


Amazing what a change it made!


Took a drive to Mohn Electric, in Uptown.  They helped me match the candle tubes, and grabbed me some new cardboard insulators.  Once home, I had to trim all the tubes down to 3 1/2 inches, because Mohn only had 4-inch tubes.  (I had seen some 3 1/2-inch ones online, but by the time I'd pay shipping, the price was ridiculous!)

Now all that remains is to put in the bulbs and install the light.  For now, this sparkly chandelier will just sit in the corner of the bedroom and wait.  But at least I got to check one small thing off my To Do List!

Saturday, September 29, 2012

Scraping Popcorn on a Saturday Night


This is what you do as a homeowner, I guess!  Scrapin' popcorn ceiling on a Saturday night, while your friends are out at the bars. 


We don't mind.  We're hoping to get this ceiling finished before our housewarming party in October, but obviously we've got a lot of work ahead of us.  We have these beautiful, simple coves on the ceiling, and they're going to be so pretty when they're smooth and repainted.

Ceiling Coves

Tonight, we covered the floors with ram board, opened the windows, cranked the tunes, and had a few beers, while spraying and scraping off the popcorn coating.  Getting ourselves covered with gunk in the process... 

Romeo is supervising!

We got almost all the scraping done, probably 5/8ths complete.  K will also need to do a couple layers of skimcoat when we're done, plus sanding and painting. 

Monday, August 20, 2012

Basement Flooring Addition


K is a HUGE Packer fan.  Like, borderline obsessed.  I don't mind her preoccupation with the team, and I actually support pretty much whatever she wants to do when it comes to them.   Buy stock in the team?  Sure!  Go to pretty much any game that you can?  Sure!  Buy all sorts of Packer merch whenever you see it?  Sure!       And as a result of her team admiration and the encouragement of me and our families, K has amassed quite a collection of Packer swag.

While we were looking at houses, among our considerations were: "Where will T's office be?"  and  "Where will K's Packer room be?"

No joke-- it was a serious criteria for our perfect house.  A garage would be okay, but not ideal.  Preferably a office or a basement.

K has been working on her Packer basement in this house for quite some time.  The idea is that once she has her "calm zone," she will be able to work on house projects and then escape to a room that's settled. 

She got a few rolls of black rubber flooring, left over from a remodel job.  It's the kind of flooring you see in gyms because it has some bounce and absorbs shock.  Nice and comfy to put over a hard basement floor!

However, being that this is a football-themed room, K decided to paint the flooring green.  Packer green, turf green...  exactly.   She spray-painted it in the yard, green and then clear-coat.

Little assistant Syd, helping with the tape!

She installed it on the floor with plain carpet tape.  Not a permanent install, in case she replaces it with something else later.  And as she pulled off the baseboard, we saw that the basement used to be
PINK.  We were both surprised to see that color.  It does match the spatter paint that we saw on the cinder blocks, but it just seemed like an interesting color to paint basement walls.

Actually, along with the pale brick fireplace down here, and those spattered walls, a pink wall probably looked pretty nice.  Warm and cozy, with some rugs on the floor... 
Well, it's going to look pretty different now!


Monday, August 13, 2012

Was There A Chimney?


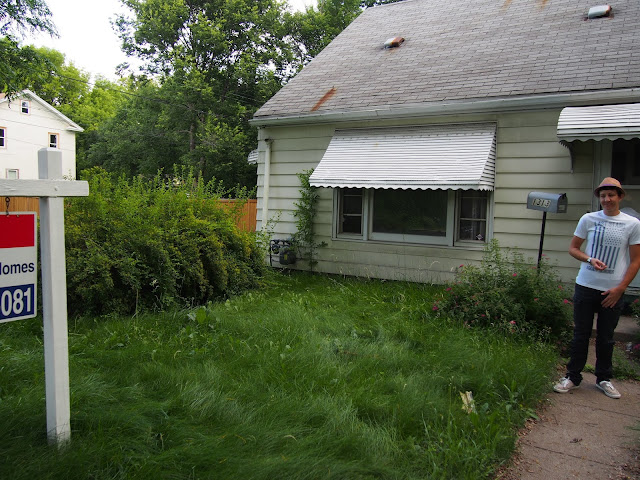
Looking at the front of our house, do you notice the stubby little chimney?


I didn't, at first.  It sort of looked like a planter.  Especially because there were overgrown weeds sprouting up out of it.

But we took a closer look, and we think the chimney used to go all the way up the front of the house.  This had to have been at least 16 years ago, since we have the MLS photo from 1997 and the chimney is short in that picture, too. 

Here are the bits of evidence that indicate the house once had a tall chimney:

#1-  Behind the wood trellis, the siding of the house is not the same.  It looks like just a piece of wood paneling, painted the same as the siding.


#2-  The eaves trough looks patched in this part.  It makes a little jump and the seams don't line up perfectly.  (Perfectly enough, though, since water doesn't leak out of the gutters here.)


#3-  The large pile of pale bricks in our backyard, at the end of the alley.  The pile is as much dirt as it is brick, but we can see them there.  And they match the bricks of the little chimney.


I would love, love, LOVE to find a picture of the house when the chimney was tall.  I think it would be really adorable.  I'd actually like to rebuild the chimney, but it doesn't fit into the designs that K has been working on.  It would probably be spendy, too.  And it's not like it would be functional.  --We figured out that the chimney now is just a plain tube sticking up from the roof in the back of the house.

So, until I find an actual picture of the house with the tall chimney, I decided to make one up so that I could see what it would look like.  I think it's cute!


Friday, July 27, 2012

Dear Scrappers....


The items in our backyard are OFF LIMITS!!  WTH?! 

Someone stole our awnings out of our back yard today, the ones we took down a couple weeks ago.
Seriously, the back yard.  Not off to the side, not anywhere obvious.  Literally, flattened and tucked in alongside other items just a foot or two from the back of our house.

Seriously?  Someone would have had to looked at the house, said, "Hey, there's only a few awnings on that house, maybe the other ones are still around somewhere."  And then gone poking through our yard to find them!

I called around to all the local scrap-yards I could find online.  I emailed pictures of the awnings to every email I could find.  We're annoyed and want them to get caught.

It's not the money that bothers us...  They probably weren't worth more than $50.  It just feels like a violation.  Someone was in our yard, close to our house, and stole something.
And what's to stop them from doing it again?

Wednesday, July 11, 2012

Awnings Are Coming Down!


Ever since the first time we saw our house, K has been saying, "Those awnings gotta go."

I didn't care either way, really.  The awnings were fine, doing their job keeping the rain off our heads as we go in the door.  The window awnings did block the view more than I liked, though.  And I know awnings are supposed to be helpful with shading the house, but our house faces South, so the couple side windows are really the only ones that get intense light.
I agreed with K that the house would look drastically different without them, and I told her she should take them off if that's what she wanted.

I can't believe they lasted a whole month, truthfully.

Work in progress...  My handy-lady on her ladder.

Determined...

And the result...?  Our house is awake!


Not all of the awnings are off, yet.  We took off the 3 from the front of the house, and 3 from the first-floor side windows.  We left the ones on the 2nd floor, for now, because those will take a little more effort to get down.  And we left the big awning over the side door, since that's the door we always use, and it's nice to have for the rain, and eventually for the snow.  We'll take that down when we can replace it with something else right away.

We like it!  K was right, it does look nicer.  Plain, but still nicer.  And we'll make it look better soon.

Tuesday, July 10, 2012

Basement Bedroom - Mold!


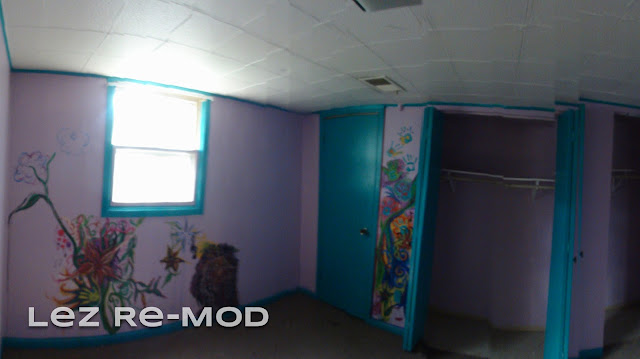
Check out our colorful basement bedroom:

Forgive the choppy panorama-- this was during our first walk-thru of the house & I was hurrying.

It's really actually a nice room, under all this loud paint.  Big closets, nice egress window, basic walls and ceiling.   The floor has some fairly gross carpet, and under that is some linoleum tiles, like the rest of the basement, but mostly just concrete.

The corner on the left is where the water damage occurred.

K got started on repainting the walls, and noticed a musty smell that would not go away, no matter how much we aired out the room.  Upon some investigation outside, she found that the drainpipe on that corner of the house had become separated from the gutter at some point after the tenants had moved out (we assume, but it could've been before.)  So the gobs of rain that we got all through May were just streaming in next to the house, and settling right in this corner of the basement.  She tapped the walls in the lower corner, there on the left, and yup--  soft sheetrock.

No longer just a simple paint job, K got started cleaning out the mold and repairing the walls.  Lucky for us, the water hadn't affected a whole lot of the walls, and K was able to take out what was damaged and repair just those areas.

Repair in progress-- studs replaced, water-barrier paint on the cinder blocks.  Moisture-resistant sheet-rock going in.

After the sheetrock was pulled out, we made an interesting discovery.  The cinder blocks in this room had a very fancy splatter paint on them.  The underlying color was like a pale beige, and over that was gray, pink, and light brown splatters.  Very obviously done on purpose, since the application of all three colors was so even.  So curious to know what this room looked like before and what it was used for!  It's definitely nice to have another bedroom in the house, but this is still the basement and this is still Minnesota.  I can't imagine that sleeping in here year-round would be very comfortable, so I wonder if it was used for something else.  I'm really liking this wall paint, honestly!


So, the room is on its way.  Not nearly as quick and painless as we hoped it would be, but it certainly wasn't as bad as it could have been.  After some of the mold problems we saw when looking at houses, I know we were pretty lucky that this is all we have.

I actually felt bad painting over this with the water-barrier paint!

Wednesday, June 20, 2012

The First Photos of Our House / Before Any Work

I realized it may be helpful to post together all of the photos we have of the house before we start renovations.  Since all the rooms need some sort of renovation, some rooms more than others-- all the "before" photos will be all together here.


Living Room


Big window in living room


One corner of the coved ceiling in the living room 


Front door and front hall closet


Kitchen


Kitchen


Kitchen, looking into hall and living room


Kitchen wall


Kitchen floor


Kitchen ceiling


Kitchen ceiling and cupbaords


Kitchen cupboards and counters -- Guessing all the cupboards looked like this once


Kitchen into hallway to basement & mudroom


Above kitchen doorway into mudroom


Main floor bathroom


Main floor bathroom


Hall closet


Bedroom 1 on main floor


Bedroom 1 on main floor -- closet doors


Bedroom 1 ceiling


Paint in bedroom 1
Paint in bedroom 1


Bedroom 2


Mudroom


Hallway to mudroom and basement


Basement stairs


Basement family room


Fireplace in basement


Basement bedroom


Basement bedroom


Basement bathroom


Laundry room


Basement storage room 1


Basement storage room 2


Stairs to second floor


Stairs to second floor


Second floor


Second floor


Front yard


Front yard

Back yard


Back yard


Back of the house


Front of the house